Quick Start - System Setup Tasks
This topic is part of the Studio Mapper Quick Start Guide.
Tip: If you are using a portable device, automatically display a screen keyboard for easier data entry at the face. Enable screen keyboard mode using the Setup ribbon's On-Screen Keyboard command.

In this section, you will:
-
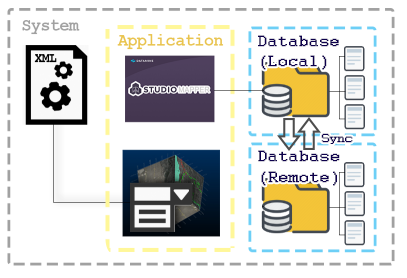
Set up a hosted database on a desktop server, configuration files and templates for Studio Mapper.
-
Get reference data and templates from the server and install them on your portable device.
If your organization already has a training database or their own way of hosting corporate data, you can adapt the instructions below to your own configuration.
The demonstration database includes face mapping data. For more information on level mapping, see Create a Level Map.
| Get Reference Data from the Server |
|||

|

|

|

|
|
If required, install Studio Mapper on your tablet. If you already have a copy, check your installed tablet Studio Mapper version by opening the Windows Control Panel. It should be the same as your server. Need to upgrade? Visit the Datamine Support Website. Need a license? Contact your local Datamine Office. |
Configure your MineTrust Connector settings, or set up your file-based database settings (local and remote location). |
Locate and open your Local Project Folder. Check that it contains (at least) the following contents:
|
Double-click StudioMapper_Demo.rmproj to launch Studio Mapper. This demonstration project won't be updated during this guide, instead you will create a new base project. For now though, review the loaded drive wireframe data, drillholes and alignment strings.
|
|
Whilst data can be transferred between versions, configuration files and other functions evolve with each release of Studio Mapper, as does this guide. Stay up to date on connected devices if possible. |
The local folder name is referenced throughout this guide. At the end of this step, you should will have a synchronized, local folder containing the latest contents of the centrally-stored Studio Mapper database. This collection will include a folder MapperDBTut, which will be referred to as your "Local Project Folder" from this point onwards.
|
Your local project folder will synchronize with the server database according to the policy adopted by your file sharing service. Whilst offline, you can build up new map data, as will be shown throughout this guide. |
Reference data may be a useful visual reference on site. A set of peg points, for example, could let you do some rudimentary georeferencing at the face using the Traverse String command and view your map-in-progress in context with the geological model, drillholes and drive strings. Otherwise, you may wish to bring along some reference data for the particular area you are working in. Even without georeferencing, existing ground data can help guide your mapping process. Standard templates and a configuration file ensure your new map data and existing server map data are compatible. |


